Let’s admit; we use multiple audio devices with our computers. We connect headphones, earphones, Bluetooth headsets, speakers, microphones, and other different types of audio devices.
Although Windows 10 doesn’t restrict connecting audio devices, sometimes users get confused while managing them. Windows 10 allows you to set up custom names for the Audio Devices to deal with such situations.
If you are using the latest version of Windows 10, it will be pretty easy for you to rename your Audio devices. You don’t need to install any third-party app or edit the registry to rename the audio devices.
Also read: How to Set Default Audio Device On Windows 11
Steps to Rename Audio Devices on Windows 10
The option to rename the audio devices is buried deep under the Settings. So, if you want to rename Audio devices on Windows 10, you are reading the right article. Below, we have shared a detailed guide on how to rename audio devices.
Rename Audio Output Devices on Windows 10
In this method, we will share a step-by-step guide on how to rename audio output devices on Windows 10. Follow some of the simple steps shared below.
1. First of all, click on the Windows Start button and select Settings.
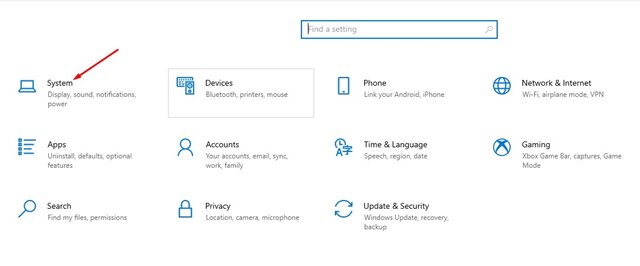
2. On the Settings page, click on the System option.
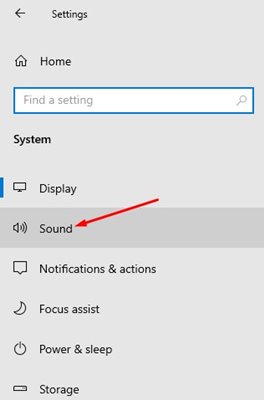
3. On the left pane, click on the Sound option.
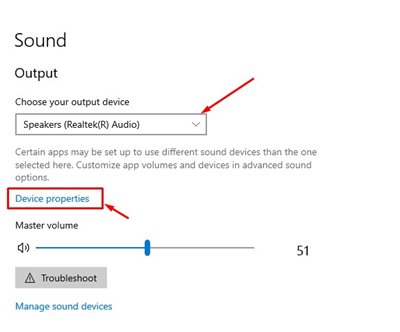
4. On the right pane, select the output device you want to rename and click on the Device Properties.
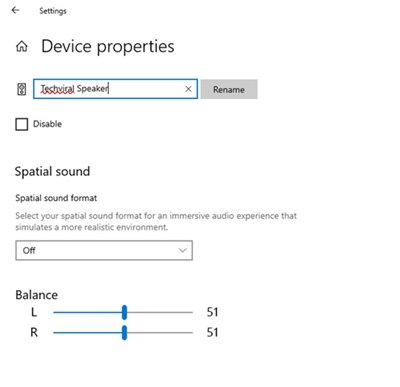
5. On the next page, enter the new Audio output device name and click on the Rename button.
That’s it! You are done. This is how you can rename the audio output device on Windows 10 PC.
Rename Audio Input Devices on Windows 10
Just like the output devices, you can rename the Audio Input devices as well. Audio input means microphone. Here’s what you need to do.
1. First of all, click on the Windows Start button and select Settings.
2. On the Settings page, click on the System option.
3. On the left pane, click on the Sound option.
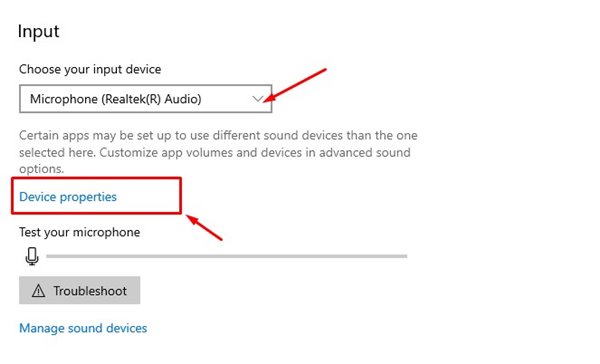
4. On the right pane, select the device you want to rename under the Input section and click on the Device Properties.
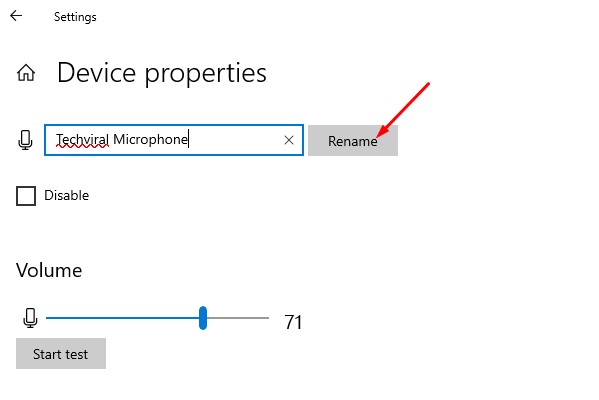
5. Enter the audio input device name and click on the Rename button on the next screen.
That’s it! You are done. This is how you can rename the Audio output & input device on Windows 10.
So, this guide is all about how to rename Audio devices in Windows 10. I hope this article helped you! Please share it with your friends also. If you have any doubts related to this, let us know in the comment box below.
The post How to Rename Audio Devices on Windows 10 appeared first on TechViral.
from TechViral https://ift.tt/3BmWOF7


