For years, Steam has served as an excellent platform for downloading and playing PC games. Steam has a huge collection of PC games, some of which are free. Popular games like PUBG, Counter-Strike Global offensive, Apex Legends, and a few others can be played via Steam for free.
If you regularly play games on Steam or leave comments on the Steam Community, you might know how important the display name is. Since people know you by your name, your display name is of great importance, especially if you participate in the community.
While creating a Steam account, we were asked to set the account name and the display name. The account name is the one that only you can see, and it’s used to log in to the Steam account. Whereas the Display Name is the name that appears in the Steam Community when you play games, leave comments, or post reviews.
Steam allows you to change the Display name in easy steps. Not only that, but you can even change your Real name and set a Custom URL that matches your Display Name. So, if you are looking for ways to change your Display Name on Steam, you are reading the right guide.
Steps to Change Your Steam Username & Profile URL
In this article, we will share a step-by-step guide on how to change your Display Name, Account Name and set custom URL for your profile on Steam. Let’s check out.
1. First of all, launch the Steam desktop client on your PC. If any update is available, make sure to install the updates.
2. On the Steam client, click on your Steam username and click on the Profile option as shown below.
3. On the Profile page, click on the Edit Profile button displayed on the right side of the page.
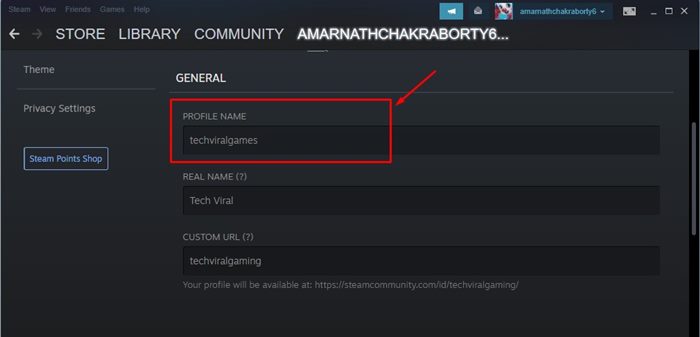
4. On the Next page, scroll down to the General section. On the General, type in the Profile name. This is the username you can use to log in with your account.
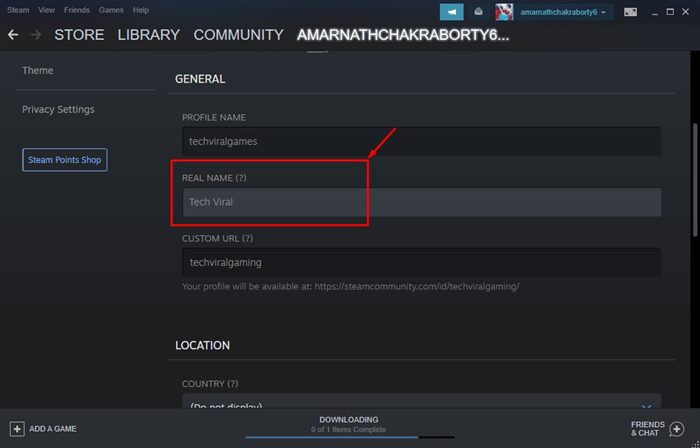
5. Next, type in the Real name. This is the Display name that will appear in the Steam Community.
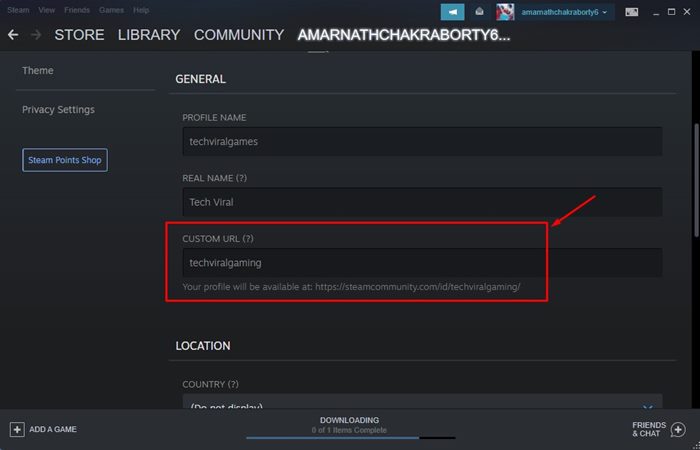
6. You will also have an option to set a Custom URL for your Profile. A Custom URL gives you an easy way to tell friends where to find your profile.
7. After making the above changes, click on the Save button located at the bottom of the screen.
That’s it! You are done. This is how you can change the Username, Display Name, and set a custom URL for your Steam profile.
The process is the same for the web version of Steam as well. So, if you use the web version of Steam, you need to implement the same steps to change the username, display name, and to set a custom profile URL.
So, this guide is all about how to change the username, display name, and set a custom profile URL for your Steam account. I hope this article helped you! Please share it with your friends also. If you have any doubts related to this, let us know in the comment box below.
The post How to Change Your Steam Username & Profile URL appeared first on TechViral.
from TechViral https://ift.tt/MCZUgqV


