If you are a Windows user, you might be very familiar with the Task Manager. Task Manager is a powerful utility of the Windows operating system that allows users to check and terminate apps and processes running in the background.
The new Task Manager of Windows 11 even allows users to check the RAM, GPU, HDD/SSD, and CPU activity in real-time. Out of all features that it provides, it was the ability to find and terminate processes that make the utility most valuable.
If you rely on Task Manager on Windows 11 to kill running processes & apps, you might have encountered an error prompt ‘Access is denied’. The error message usually appears when you try to kill apps & processes that require elevated privileges to be terminated.
Hence, if you are getting the ‘Access is denied’ error prompt while trying to kill a process, it’s likely that you are not using the Administrator account. Hence, you either log in to your administrator account or run the Task Manager as administrator to kill such a process.
3 Best Ways to Run Task Manager As Administrator in Windows 11
Since we have already shared a detailed guide on enabling an Administrator account on Windows 11, we will show you how you can run Task Manager as an administrator. So, let’s check out how to enter task manager as Admin on Windows 11.
1) Run Task Manager As Administrator via Windows Search
If you have a standard account but want to run Task Manager with elevated privileges, you need to run Task Manager as Administrator. Here’s what you need to do.
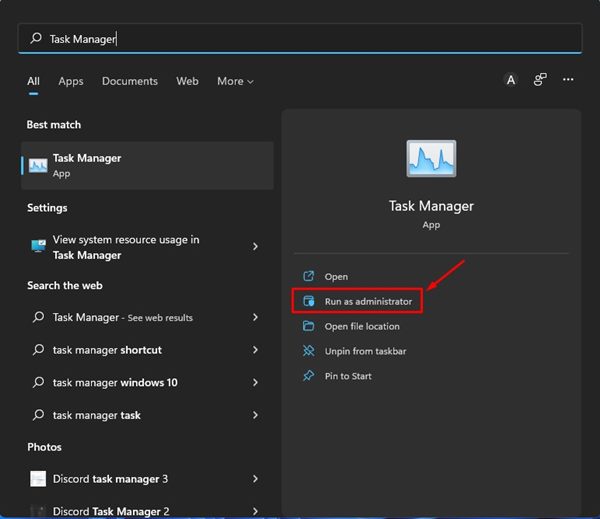
- First, click on the Windows 11 search and type in Task Manager.
- Next, right-click on the Task Manager from the search results and select ‘Run as administrator.’
- Alternatively, you can click on the Run as administrator option displayed on the right pane of the Windows search.
That’s it! You are done. This will run Task Manager as administrator on Windows 11. Now you can kill the process that requires elevated privileges to be terminated.
2) Run Task Manager As Admin via Command Prompt
We will use the Command Prompt utility on Windows 11 to run Task Manager as admin in this method. Here’s what you need to do.
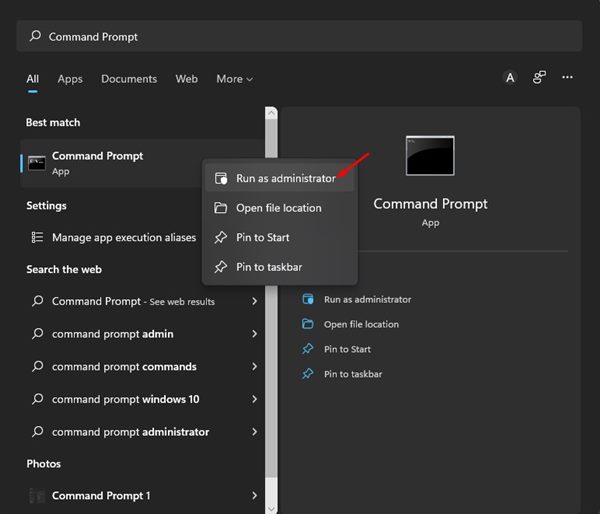
1. First, click on the Windows 11 search and type in Command Prompt.
2. Right-click on the Command Prompt and select Run as administrator.
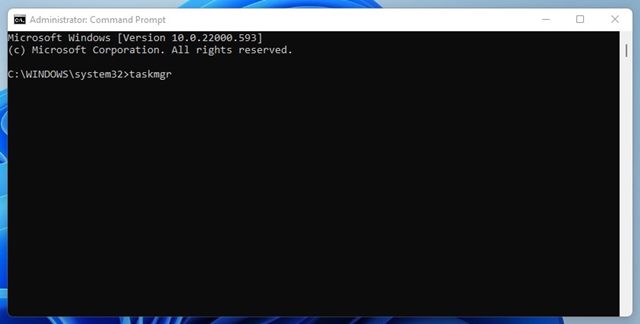
3. On the command prompt, type in taskmgr and hit the Enter button.
That’s it! You are done. This will run the Task Manager on your Windows 11 with full admin rights.
3) Run Task Manager as Admin via Desktop Shortcut
On Windows 11, you can create a desktop shortcut for always running task manager as admin. Here’s what you need to do.
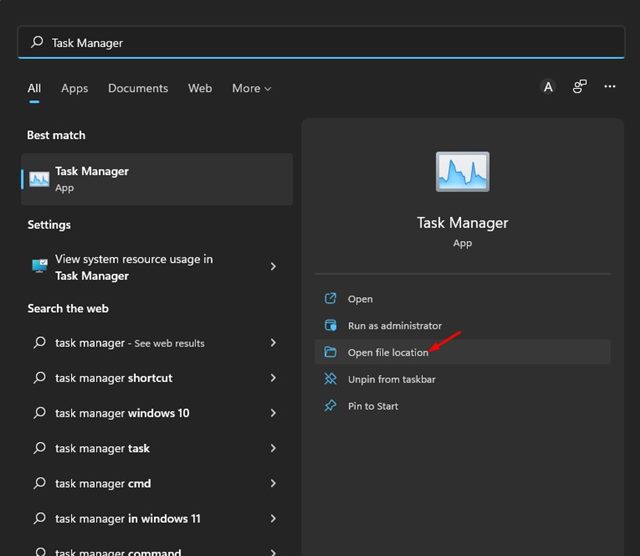
1. First, open the Windows 11 search and type in Task Manager.
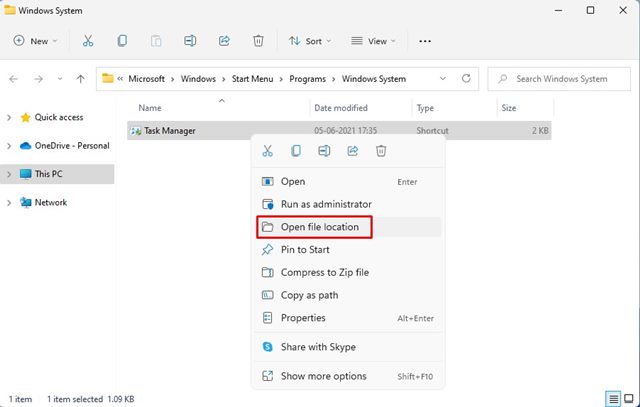
2. Right-click on the Task Manager from the search result and select Open File Location.
3. On the open folder, right-click on the Task Manager shortcut and select Open file location.
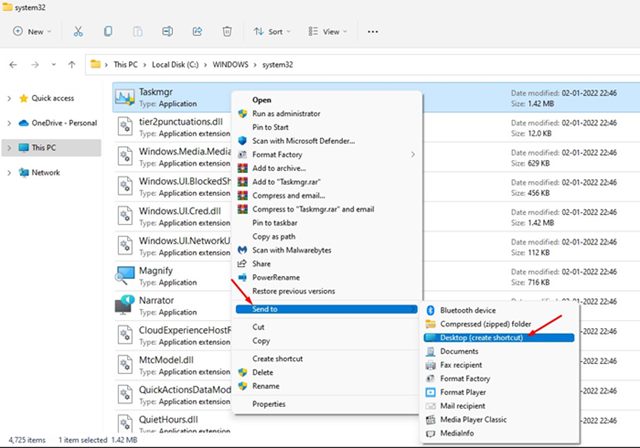
4. Next, right-click on Taskmgr.exe and select Send to > Desktop (create shortcut).
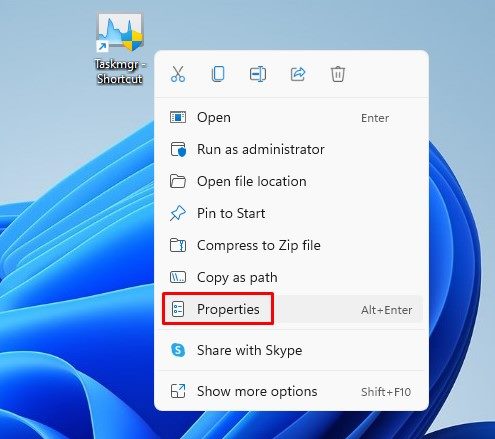
5. Right-click on the shortcut file on your desktop and select Properties.
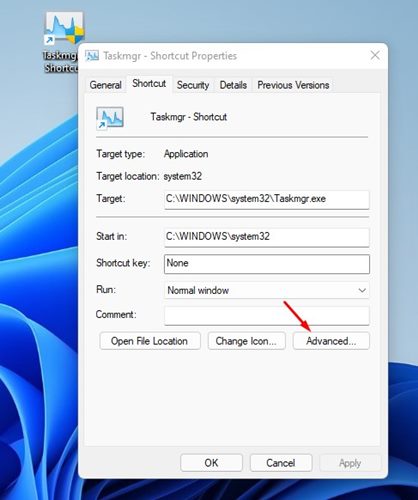
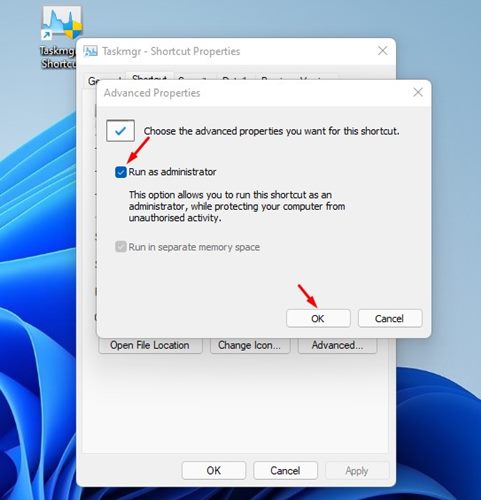
6. On the Taskmgr.exe – Shortcut properties window, click on the Advanced option.
7. On the Advanced Properties dialog, check Run as administrator and click on the Ok button.
That’s it! You are done. Whenever you want to run Task Manager as admin on Windows 11, double click on the Desktop shortcut you have created.
You can run Task Manager as admin on Windows 11 to perform specific tasks that require admin privileges. Like the Task Manager, you can also open PowerShell as an administrator in Windows 11. So, these are the three best ways to access Task Manager with full rights on Windows 11.
The post How to Run Task Manager As Administrator in Windows 11 (3 Methods) appeared first on Tech Viral.
from Tech Viral https://ift.tt/dIksmPU


