

Even though there are third-party apps to delete junk files, duplicates, and old files, you don’t need them if you use the latest builds of Windows 11.
The latest builds of Windows 10/11 provide an option to auto-delete old files. Old files are files that have not been modified for a while; they could also be junk files or duplicates.
Auto Delete Old Files on Windows 11
Deleting old files on Windows 11 will bring a few benefits; you can free up some storage space, improving the startup time & performance.
Deleting old files on Windows 11 will make your file explorer less cluttered and make it easier to access important files.
There are various ways to auto delete old files on Windows. Below, we have shared some of them.
1. Auto Delete Old Files With Storage Sense
The built-in Storage Sense needs to be configured to auto delete the old files. Here’s what you need to do.
1. Click on the Windows 11 Start button and select Settings.
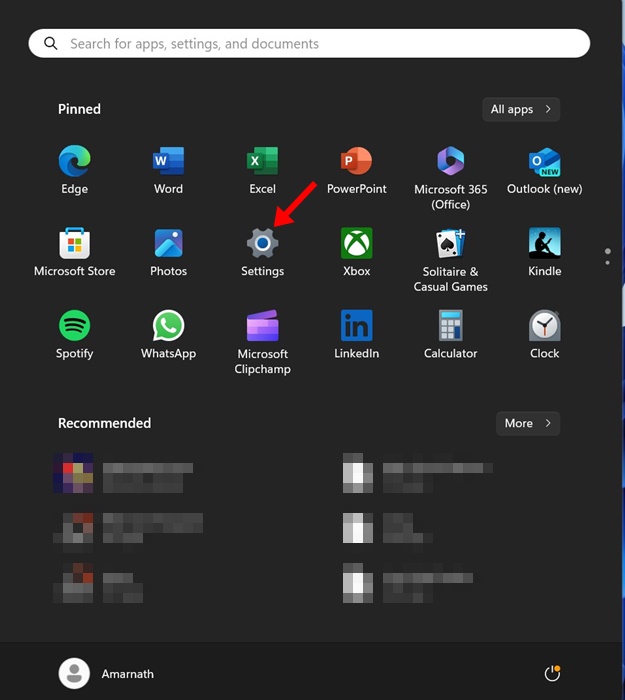
2. When the Settings app opens, switch to the System tab.

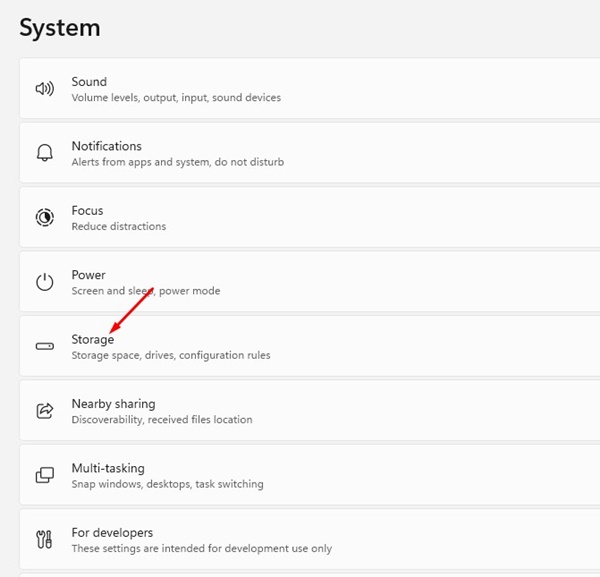
3. On the right side, click on Storage.
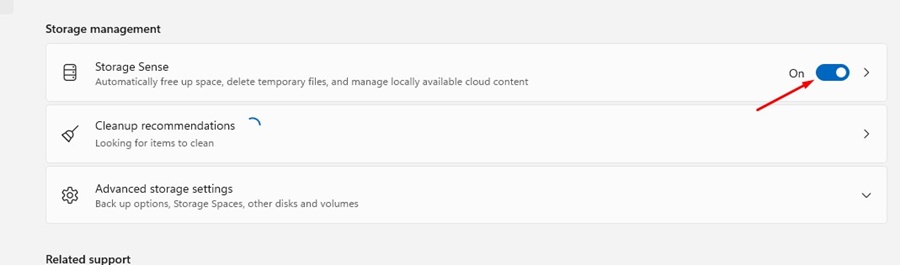
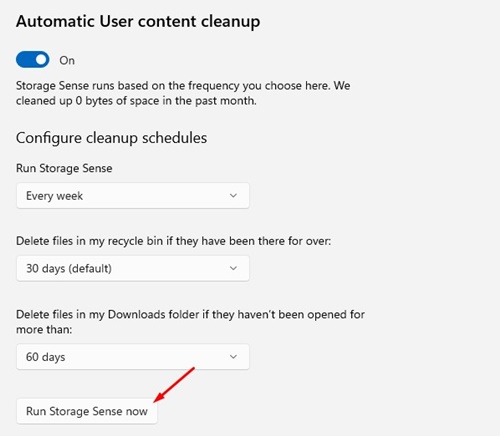
4. Enable the Storage Sense toggle.
5. Scroll down to the Configure Cleanup Schedules section. You will find three different options; here are the recommended schedules.
- Run Storage Sense: Every Week
- Delete files in my recycle bin: 30 Days
- Delete files in my Downloads folder: 60 Days
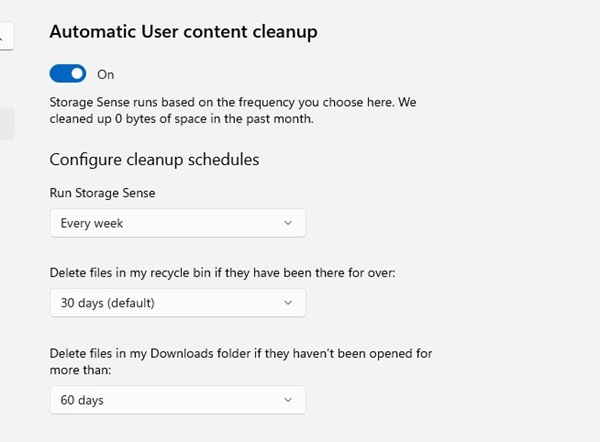
6. After configuring the schedule, click the Run Storage Sense Now button.
This will immediately run the Storage Sense and delete the old files stored in your Recycle bin, Downloads folder, etc. It will also remove the junk files stored on your system installation drive.
2. Auto Delete Old Files on Windows with Command Prompt
If you feel comfortable with the Command Prompt, you can use it to auto delete the old files. Here’s how to use it.
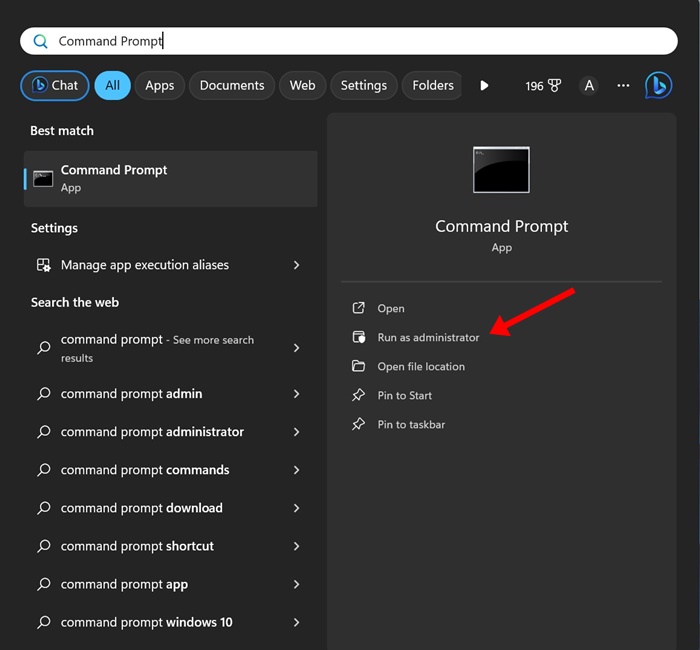
1. Type Command Prompt in the Windows 11 Search. Right-click on the Command Prompt and select Run as administrator.
2. When the Command Prompt opens, execute this command:
ForFiles /p "C:\Path\To\Folder" /s /d -30 /c "cmd /c del /q @file"
Here’s what the command does:
/p – It tells the ForFiles where to look for the files.
/s – This one searches in subfolders.
/d – This specifies the last modification date of a file.
/c – This tells ForFiles to delete the files ‘cmd /c del @file’
/q – This bypasses the delete confirmation.
Important: In the command, replace the “C:\Path\To\Folder” with the specific folder location you used to look for old files. Also, you can modify the last modified date in the command ’30’ with any date that suits your needs.
For example, the final command would look like this: ForFiles /p “F:\FFOutput” /s /d -20 /c “cmd /c del /q @file”

The above command will search our specified folder. We have also modified the last modified date from 30 to 20.
3. Executing the command will delete the old files stored in the specified location.
3. Use Microsoft PC Manager to Auto Delete Old Files
Microsoft PC Manager is a utility designed to check your device’s health, manage storage space, end resource-hogging applications, and more. You can use it to auto delete old files on Windows.
1. Download & Install Microsoft PC Manager on your PC. Once installed, open it from the Windows Search.
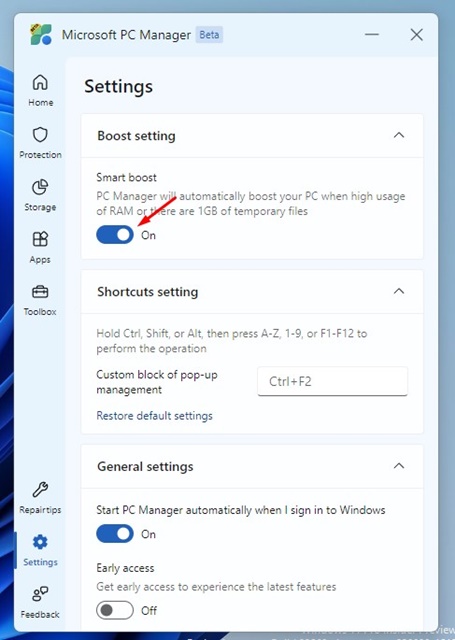
2. Click on the Settings gear icon at the top and select Settings.

3. You need to enable the toggle for Smart Boost. This feature boosts your PC when it has high RAM usage or 1GB of temporary files.
4. You can also click the Boost button on the Microsoft PC Manager’s dashboard to instantly clear the temporary files.

4. Auto Delete Old Files Using Third-Party Tools
You can take the help of third-party tools to auto delete old files on Windows. You need to search for tools that allow old file deletion.
Most of these storage cleaner tools require purchasing a subscription or a license, but you can also settle for free options.
This guide explains how to auto-delete old files on a Windows PC. Also, if you find this guide helpful, share it with your friends.
The post 4 Best Ways to Auto Delete Old Files on Windows appeared first on TechViral.
from TechViral https://ift.tt/3IG0CvR

